How-To
About SMARTCODER
SMARTCODER is an online service for coding free-text answers to open ended questions in surveys. It performs an intelligent content analytics process of free-text answers and automatically generates an accurate code table and assigns appropriate codes to free-text answers. Additionally, a CodeCloud visually summarizing the result is generated. All this takes just a few moments.
In order to automatically code (=SMARTCODING) your survey, a specifically engineered clustering method is applied to your data. This method is based on an intelligent content analytics process that generates the so-called SMARTCODES.
Start off by uploading your survey data and you receive from SMARTCODER for each open ended question (=variable)
- the code table,
- the coded free-text answers, and
- a CodeCloud that visually summarizes the most frequent codes of each open ended question.
How it works?
- After you've registered and logged in, you can create a new SMARTCODER project.
- Then upload your survey data. SMARTCODER supports Microsoft Excel (.xlsx) and .csv (Character Separated Values) files. Please note that in case of an Excel file the coding process is only applied on the first worksheet.
- Then select the variable that should be used as the primary key variable and select those variables that should be coded. You can select one or more open ended questions.
- Now you can start SMARTCODING and in a few moments (depending on the number of free-text answers per selected question), the appropriate code tables are created and associated with the free-text answers.
- The results can be viewed and adapted with the editor.
- You can download the result including code table and coded free-text answers in Excel (.xlsx) format as well as the CodeClouds (.png). These files are made available for download as a compressed ZIP archive.
SMARTCODER is a hosted service. To take advantage of the functionalities of SMARTCODER, you do not need to download or install any software on your computer. SMARTCODER dramatically reduces the duration of your coding work. Additionally, SMARTCODER ensures that coding of your valuable survey data is unbiased: neither personal perception of the coder nor the pressure to meet deadlines influence the coding result.
Your Project List
After you have logged in, an overview about your previously created projects is displayed. Apart from the project name, the modification date, the file name of the uploaded survey, the language that was used for processing, the total number of processed variables, created codes and answers are displayed. By clicking on the column headings, you can select the sorting criteria of the project list. The results can be downloaded by clicking the button with the arrow icon. A project can be removed by clicking the trash icon.
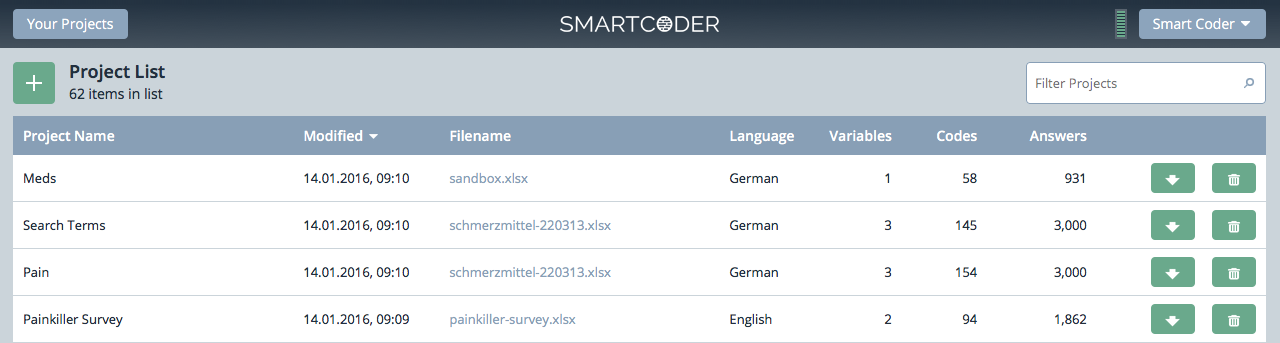
The project list can be searched by entering a search term into the "Filter projects" field.
Creating Projects
In order to create a new SMARTCODER project, please click the button "+Upload File and Create Project" and select the survey on your computer, which shall be processed by SMARTCODER. You may also simply drag and drop a survey file into the project list. By doing so, a new project is created.

You can either provide a Microsoft Excel (.xlsx) or a .csv file. In both cases, the first row of your data may contain variable names. All remaining rows have to correspond to exactly one answer.
- Surveys in Microsoft Excel 2007 format: If you provide a survey in Microsoft Excel 2007 file format, make sure that the file is not password protected. Please note that only the first worksheet is processed.
- Surveys in .CSV format: If you provide a survey in .csv file format, make sure that the information in the file is separated by a delimiter such as a comma or a semicolon.
General Settings
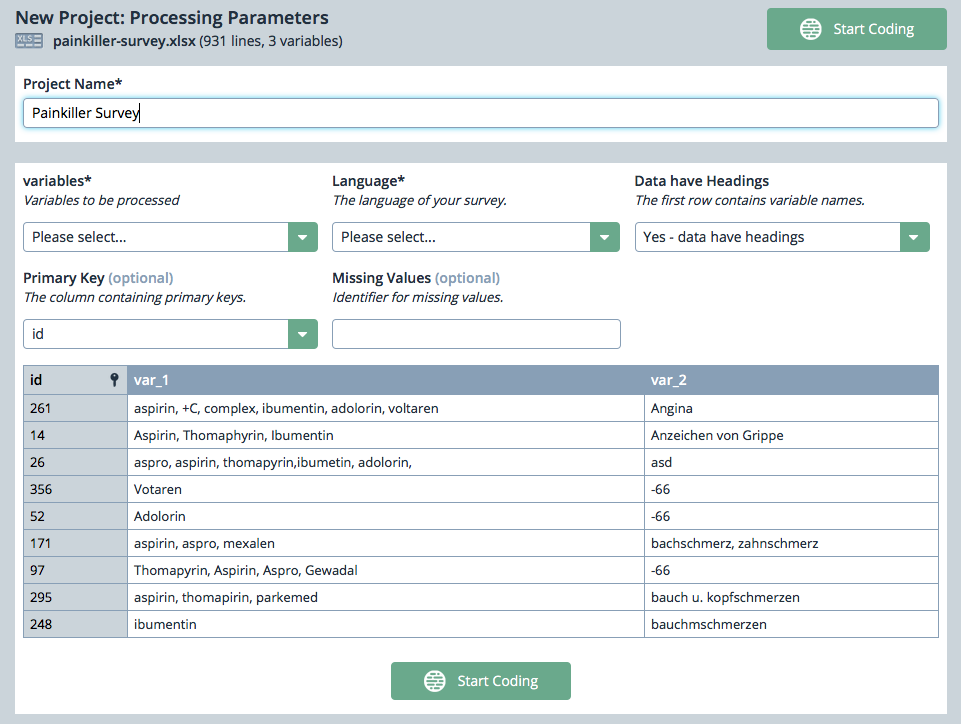
After you have uploaded your survey, you can provide a project name. Additionally, the following parameters allow you to specify
- the language of the answers in your survey. You may choose between German and English. The chosen language applies to all selected variables.
- whether your data have headings. If this is the case, the first row will not be coded since it contains the variable names.
- the variable containing the primary key.
- the pattern (string or numeric value), which identifies missing values.
.CSV Settings
If you provide your survey in the .csv file format, some additional parameters can be configured:
- Delimiter: Please select the character that separates values in your text file (e.g. comma, semicolon...)
- Text qualifier: Additionally, you can specify the character that encloses values in your text file. When SMARTCODER encounters the text qualifier character, all of the text that follows that character and precedes the next occurrence of that character is imported as one value, even if the text contains a delimiter character.
- Encoding: Please select the character set that is used in the survey file. In most cases, you can leave this setting at its default. If you know that the file was created by using a different character set than the character set that you are using on your computer, you should change this setting to match that character set.

Variable Selection and Preview
After you have uploaded your survey file and have made the necessary changes to your settings, please select those variables (=columns) that shall be processed by SMARTCODER. To check if SMARTCODER has correctly identified your data and whether the desired variables are used for the SMARTCODING process, a preview of your survey (the top 10 lines) is displayed.
Start Processing
As soon as you have configured all parameters, please click "Start Coding" to initiate the coding process.
SMARTCODING
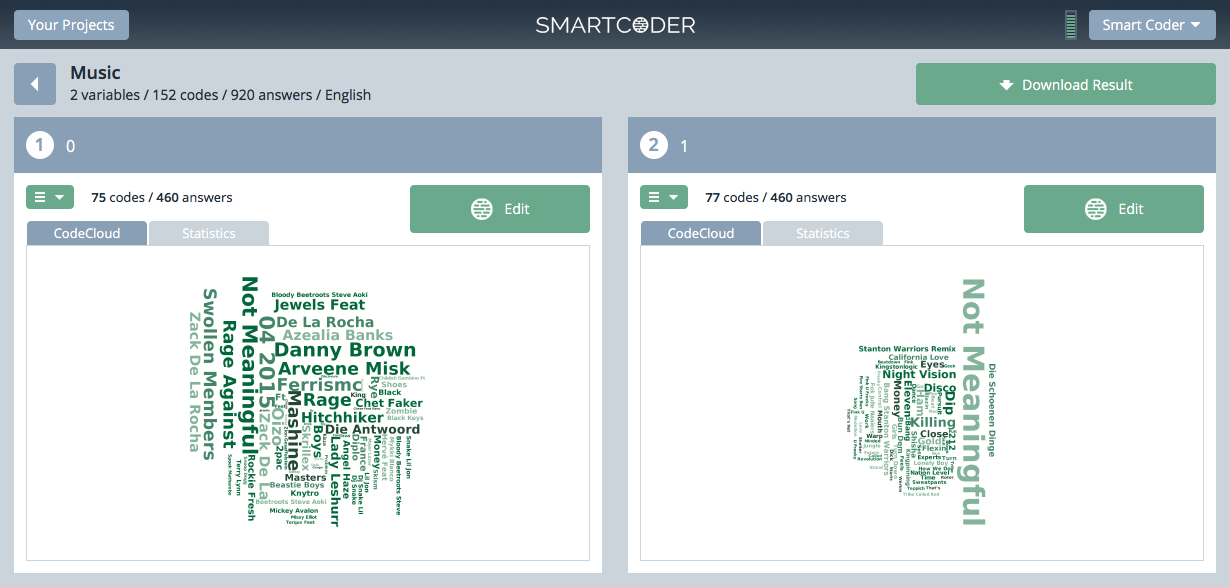
Once you have started the coding process all selected open-ended questions are analyzed and processed. The processing time depends on the number of variables to be coded and the number of free-text answers per variable. In order to automatically code (=SMARTCODING) answers to open-ended questions in your survey, a specifically tailored clustering method is applied to your data. This method is based on an intelligent content analytics process that generates so-called SMARTCODES. As soon as the coding process is completed, an overview of the coded variables is displayed. For every variable, the question, the CodeCloud (i.e., a WordCloud of codes), a table with statistical data and two buttons are shown.
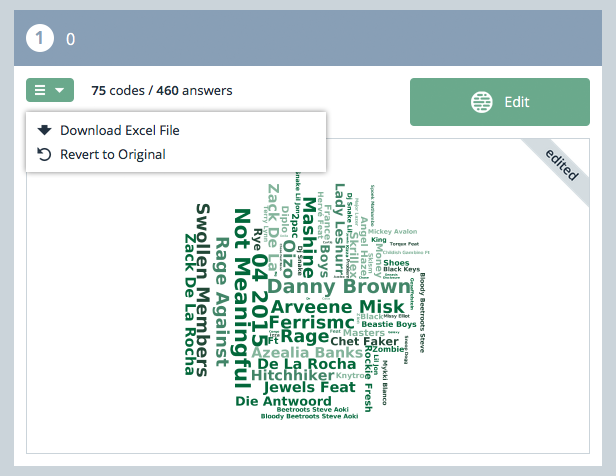
When clicking "Edit" the editor opens up and you can make changes to the coding. Further actions are displayed by clicking on the actions icon  . In this particular case you can select between downloading the result of the coding process of the respective variable and restoring the original (automatically generated) coding result. By restoring the original coding result, all manually performed changes are irrevocably discarded. Note that this feature is available only, if you have made changes to the original coding. This is indicated through the tag "edited".
Information about a Variable
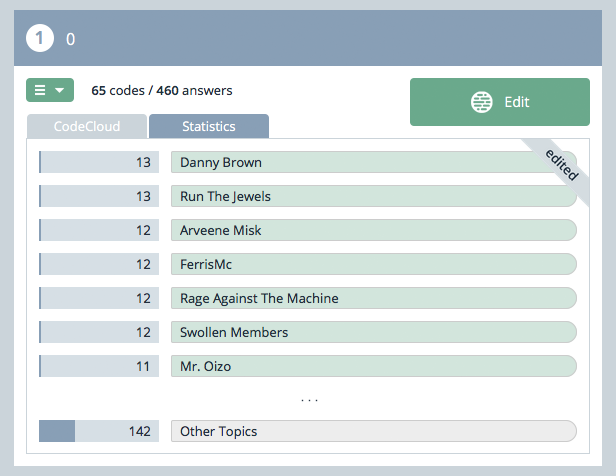
Next to the actions icon, the number of codes and the number of answers for the respective variable are displayed. By clicking on "Statistics", the top 7 codes and the respective number of answers for each of these codes are displayed. Furthermore, the "Other Topics" category is shown, which gives the number of answers that have not yet been categorized.
Assigning the Question a Variable
The question underlying a variable can be entered by moving the mouse cursor over the question label:

The label changes to a text field and by clicking the left mouse button, the cursor is placed within the text field. Now you can enter the question or change the current text.
Refining the Coding of a Variable
The code table and the assignments of codes to answers can be refined and customized. By clicking the "Edit" button, the SMARTCODER editor opens up. More information on how to use the editor is provided in the respective section of this manual.
The Editor
The SMARTCODER editor allows you to add, change, combine and delete codes. Furthermore, the code table and the assignments between codes and answers can be refined accordingly.
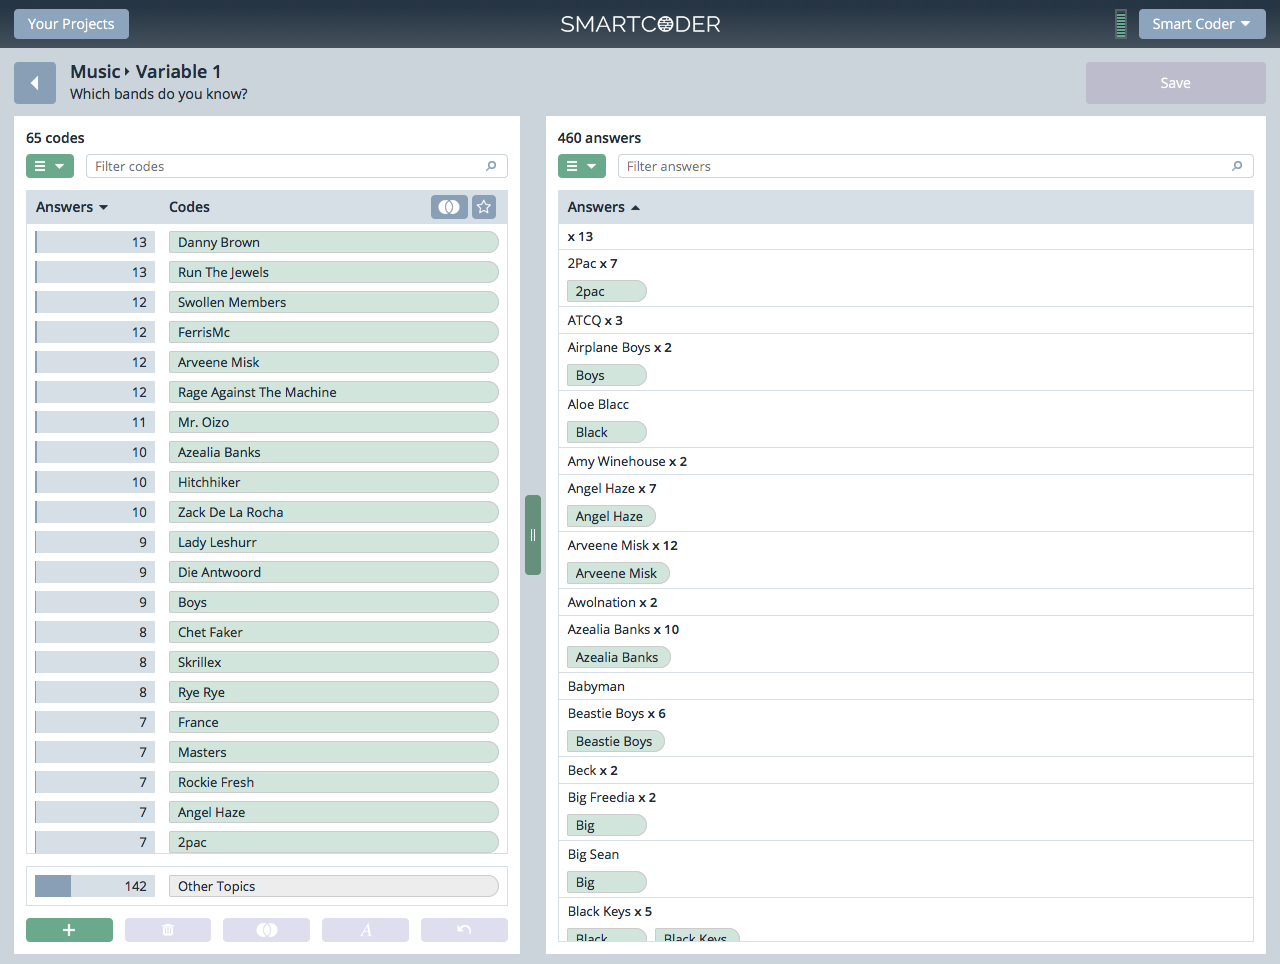
The two primary components of the editor are the list of codes on the left and the list of answers on the right side. Codes that have been assigned to an answer are shown below the respective answer. The lists can be sorted and their content can be filtered by entering a search term in the search boxes above the lists. If there are more than 1,000 unique entries in the list of answers, the list is being paginated. In this case, pagination controls are displayed below the list enabling the navigation to a specific page.
If you select one or more codes while the "Union" symbol  is activated, all answers that are linked to these codes are displayed in the list of answers (union).
By clicking on the "Intersection" symbol  , the intersection of answers that are associated with the selected codes can be formed. Thus, only those answers are displayed that are associated with each of the selected codes.
To change the code assignment of answers you can either drag & drop codes to an answer or drag & drop answers to a code. To delete a code simply click on the 'x' to the right of the code label below an answer. The code is then no longer assigned to this answer.
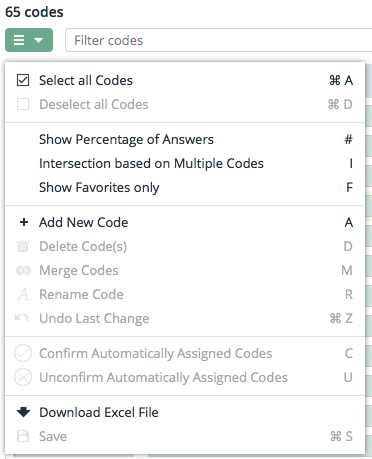
The buttons below the list of codes allow you to:

- Create a new code ("+" icon).
- Delete existing codes (trash icon).
- Merge two or more codes (icon with two overlapping circles).
- Rename existing codes ("A" icon).
- Undo changes (arrow icon).
The current list of answers can by locked by clicking "Lock answers in current List of Answers". This allows to assign codes to a specific selection of answers.

For example, if you want to assign codes to answers that have not been coded so far, you can proceed as follows. Select the category "Other Topics", which is located at the bottom of the code list. As a result only those answers are shown that have not received a code yet. Lock the current selection of answers and drag & drop codes from left to right or answers from right to left to code the answers. If no suitable code exists create a new code  or rename
  an existing code with a different description.
To save your changes, click the "Save" button above the list of answers. In order to return to the project summary, move your mouse over the arrow icon above the code list. The button "Back to Project Summary" shows up and by clicking it you return to the project summary.
Display Options
Sorting of Lists
The list of codes as well as the list of answers can be sorted by different criteria. The list of codes can be sorted alphabetically by name and by the number of answers that are assigned to a code. The list of answers can be alphabetically sorted by the answer text. To sort a list, move the mouse cursor over the title of a column. By clicking the left mouse button the list gets sorted with respect to the current column. If the list was not sorted, the column will be sorted ascendingly and an upturned triangle is displayed. If you click on the column title again, the column gets sorted descendingly and a downturned triangle is displayed. By clicking repeatedly on the column title the sorting is toggled between ascending and descending mode.
Absolute / Relative Number of Answers
The number of answers that are assigned to a code can either be shown in absolute or relative numbers. The display of absolute numbers shows how many answers are assigned to this code. The display of relative numbers shows the percentage of answers that are assigned to this code. For example, if all answers are assigned to a single code, a percentage of 100% is shown. To toggle between the display of absolute and relative answers, either select "Show Percentage of Answers" in the menu above the code list or click on an entry in the column of assigned answers:
Hide / Display Codes
It is possible to toggle the display of codes that are assigned to answer. Select "Show Codes below Answers" in the menu above the list of answers to show or hide the codes that are assigned to an answer.
Lock Answers in Answer List
The currently displayed list of answers can be locked by selecting "Lock Answers in current List of Answers" in the menu above the list of codes. As a result, the list of answers is locked and does not change when a different code is selected. This simplifies the assignment of different codes to multiple answers. Note that locking of answers does not restrict the filter functionality. It is still possible to filter the locked answers by their content.
Hint: The locking of answers is especially useful if you want to code answers that have not been coded yet. Remember that all answers that have no code assigned are put in Other Topics. Therefore, first select Other Topics and then lock the list of answers. You can then assign different codes to an answer while the list of answers stays the same and you are able to quickly spot those answers that have not been coded yet.
Selecting and Filtering
Selecting Codes
To perform an action on codes (e.g. deleting or renaming) or to assign codes to an answer, they have to be selected. To select a code, click on a code. By clicking again the code is deselected.
In addition, you can use the following keyboard shortcuts to select more than one code:
- CTRL-key (Windows) or CMD-key (OSX)
- Depending on your operating system, hold down the CTRL or Command key while clicking a code.
- The already selected codes remain selected and the clicked code gets selected as well.
In addition, the CTRL-key and the Shift-key (Windows) or only the Shift-key (OSX) can be used to select a contiguous list of codes:
- CTRL-key and Shift-key (Windows) or Shift-key only (OSX):
- Select a code.
- Press and hold down the CTRL-key and Shift-key (Windows) or the Shift-key (OSX) only and click on a code below or above the selected code.
- All codes which are located between the previously selected code and the new code will become selected.
Selecting or deselecting codes can be achieved by clicking "Select All Codes" or "Deselect All Codes" above the list of codes.
Selecting Answers
To assign answers to a code they have to be selected first. To select an answer, click on an answer in the answer list. By clicking it again it becomes deselected.
You can use the following keyboard shortcuts to select more than one answer:
- CTRL-key (Windows) or CMD-key (OSX)
- Depending on your operating system, hold down the CTRL or Command key while clicking an answer.
- The already selected answers remain selected and the clicked answer is selected as well.
In addition, the CTRL-key and the Shift-key (Windows) or only the Shift-key (OSX) can be used to select a contiguous list of answers:
- CTRL-key and Shift-key (Windows) or Shift-key only (OSX):
- Select an answer.
- Press and hold down the CTRL-key and Shift-key (Windows) or the Shift-key (OSX) only and click on an answer below or above the selected answer.
- All answers, which are located between the previously selected answer and the new answer will become selected.
Note: If there are more than 1,000 unique entries in the list of answers, the list is paginated. Pagination controls are displayed below the list enabling the navigation to a specific page.
Filtering Codes
The search box above the list of codes allows you to filter codes by their name. Enter a search term in the search box and only those codes are shown that contain the search term. The search term is highlighted within the name of the code. The search is performed instantly - as soon as you enter a character, the search is performed and only those codes are shown that contain the search term.
Filtering Answers
The search box above the list of answers allows you to filter answers based on their content. Enter a search term in the search box and only those answers are shown whose text contains the search term. The search term is highlighted within the answer text. The search is performed instantly - as soon as you enter a character, the search is performed and only those answers are shown that contain the search term.
Coding Answers
Creating Codes
To create a new code, click on the button below the list of codes. A dialog is shown where you can enter a name for the new code. The name must not be empty and must not exist yet. Click "Create" to create the new code. Click "Cancel" to abort the creation of a new code and to close the dialog.
Renaming a Code
To rename a code, click on the button below the list of codes. Note that the button is only active if exactly one code is selected. A dialog pops up where you can enter a new name for the code. The name must not be empty and must not exist yet. Click "Rename" to rename the code. Click "Cancel" to abort renaming the code and to close the dialog.
Deleting Codes
To delete a code, click on the button  below the list of codes. Note that the button is only active if one or more codes are selected. As a result, the codes will be removed from all answers to which they are assigned. If you delete a code, the code is removed from all answers to which it was assigned. Furthermore, all answers that were only assigned to this code are put into "Other Topics".
Merging Codes
To merge two or more codes, click on the button  below the list of codes. Note that the button is only active if two or more codes are selected. A dialog pops up that shows a list of all codes which are about to be merged. You can either select an existing name for merging codes or you can enter a new name. To select an existing code, click on the radio button preceding the code and click "Merge".
To provide a new name for the merged codes, enter the name in the text box that is shown at the bottom of the dialog. The name must not be empty and must not exist yet. Click "Merge" to merge the codes. Click "Cancel" to abort merging of codes and to close the dialog.
Please note that codes are merged depending on whether the union or intersection should be formed. In case of a union merge (i.e., the button is activated), all answers that are assigned to the selected codes will be assigned to an existing or a new code. In case of an intersection merge (i.e., the button is activated), only those answers are merged, which are assigned to all selected codes. For these codes, a new code has to be created. This new code is then assigned to this particular subset of answers.
Assigning Codes to Answers
You can assign one or more codes to an answer by drag & drop. This can be achieved as follows:
- Select one or more codes.
- Place the mouse cursor in the list of codes.
- Press and hold the left mouse button.
- Drag the mouse cursor.
- A box is displayed next to the mouse cursor showing all codes that are selected.
- Drag the mouse cursor to an answer in the list of answers.
- Release the left mouse button.
- The selected codes are now assigned to this answer.
Assigning Answers to a Code
You can assign one or more answers to a code by drag & drop. This can be achieved as follows:
- Select one or more answers.
- Place the mouse cursor in the list of answers.
- Press and hold the left mouse button.
- Drag the mouse cursor.
- A box is displayed next to the mouse cursor showing all answers that are selected.
- Drag the mouse cursor to a code in the list of codes.
- Release the left mouse button.
- The selected answers are now assigned to this code.
Removing Codes from an Answer
To delete a code from an answer, you first have to make sure that the codes of an answer are displayed. Make sure that "Show Codes below Answers" in the menu above the list of answers is enabled. The code of an answer can now be removed by clicking on the 'x' of the code label.

The code is no longer assigned to this answer.
Saving Changes
To save your changes click on the "Save" button above the list of answers. This will save the current list of codes and the current assignments of codes to answers.
Undo Changes
The changes that you have performed can be undone by clicking the button  . A "change" is a single action that you performed (e.g. deletion, assignment). You can step back through the list of changes by repeatedly clicking the button. The button is only active if you have already performed a change.
Closing the Editor
The editor can be closed by clicking on "Back to Project Summary". If no changes have been made, you are directly taken back to the project summary. If you have made changes, a dialog with the following options is shown:
- "Discard Changes": Click this button to discard changes and return to the project summary.
- "Cancel": Click this button to close the dialog and return to the editor.
If you have made changes and click on a link or button outside of the editor, a dialog is shown as well. The look and feel of this dialog depends on your browser and your language settings. It should provide you with two options: you can either confirm to leave the page or you can stay on the page, i.e. get back to the editor. In the latter case you can save your changes and continue to leave the editor afterwards.
Downloading Coded Survey
Once you have completed coding, you can download the coded survey. SMARTCODER generates a ZIP archive containing the result. This archives contains two files for each variable that was processed by SMARTCODER. Please note that, regardless whether you have provided a survey in Microsoft Excel or .csv file format, the result is provided as a Microsoft Excel file.
- A Microsoft Excel (.xslx) file with three worksheets which are explained in the following sections, and
- the CodeCloud (.png) file.
For example, if you have processed three variables, the ZIP file contains six files.
Code Table (Sheet 1)
The first worksheet (code table) contains the code table. The first column (id) is a unique sequence number; all generated codes are stored in the second column (code); the third column (variable) maps a code onto a unique variable name (these variables are used to assign codes to free-text answers); the fourth column (#abs) gives the absolute number of free-text answers that were assigned to the respective code. The fifth column (%) gives the percentage of free-text answers that are associated with the respective code. The following table provides an example of a code table.
| id | code | variable | #abs | % |
|---|---|---|---|---|
| 1 | Danny Brown | Which bands do you know?_1 | 13 | 2,83% |
| 2 | Run The Jewels | Which bands do you know?_2 | 13 | 2,83% |
| 3 | Arveene Misk | Which bands do you know?_3 | 12 | 2,61% |
| 4 | FerrisMc | Which bands do you know?_4 | 12 | 2,61% |
| 5 | Rage Against The Machine | Which bands do you know?_5 | 12 | 2,61% |
| 6 | Swollen Members | Which bands do you know?_6 | 12 | 2,61% |
| 7 | Mr. Oizo | Which bands do you know?_7 | 11 | 2,39% |
| 8 | Azealia Banks | Which bands do you know?_8 | 10 | 2,17% |
| 9 | Hitchhiker | Which bands do you know?_9 | 10 | 2,17% |
| .. | ||||
| .. | ||||
| 65 | Other Topics | 57 | 15,27% |
Please note that the answers, which no code has been assigned, were put into the category "Other Topics".
Coded Survey (Sheet 2)
The second worksheet (coded survey) gives a matrix mapping free-text answers to each code. The first column contains the primary key you have selected. The remaining columns correspond to the generated variables, which can be mapped onto codes by means of the code table. Each assignment between code and free-text answer is indicated by a "1"; all remaining cells are set to "0".
Summary (Sheet 3)
The third worksheet (summary) features three columns: The first column contains the primary key you have selected; the second column gives the original content of the coded variable (i.e., the answers to open-ended questions). The third column contains all codes that are assigned to the respective free-text answer. Multiple code assignments are separated by means of a comma.
| id | Which bands do you know? | codes |
|---|---|---|
| 26 | Rockie Fresh | Rockie Fresh |
| 14 | Childish Gambino ft. Problem | Childish Gambino, Problem |
| 189 | Ty Dolla $ign | Dolla |
| 4 | Swollen Members | Swollen Members |
| 33 | Skepta ft. JME | Skepta, Sme |
| 29 | Zion I | Zion |
| 189 | Run The Jewels feat. Zack de la Rocha | Run The Jewels, Zack De La Rocha |
| 232 | Angel Haze | Angel Haze |
| 76 | Izza Kizza | Izza Kizza |
The CodeCloud
For each variable of your survey that was processed by SMARTCODER a CodeCloud is created. This CodeCloud shows the most frequent codes for each variable. The larger a code is depicted in the CodeCloud, the more frequently it occurs in the free-text answers of the survey. A CodeCloud example is depicted below.

Minimal System Requirements
In order to use the Web-based SMARTCODER service, your system has to fulfill the following minimal system requirements:
- Please use a state-of-the-art laptop or workstation with at least 4GB of RAM;
- Your screen resolution should be at least 1280x800 pixel (the higher the better);
- You need an active broadband Internet connection;
- Please ensure that your Web browser accepts Cookies, JavaScript is enabled and pop up blockers are disabled;
- Please make sure that the compatibility mode is disabled (Internet Explorer);
- Make sure that you use one of the following Web browsers:
- Mozilla Firefox 20 or later on Windows, OSX and Linux
- Google Chrome 13 or later on Windows, OSX and Linux
- Microsoft Internet Explorer 10 or later
- Safari 5.1 or later on OSX
- Opera 15 or later on Windows, OSX or Linux
SMARTCODER by ![]()
Künstlergasse 11 / 1, A-1150 Vienna, Austria